OpenStack-Cinder: create volume data/code flow

Hello Folks,

I guess, its been quite some time since my last post. Actually, didn’t get time some free time cover up this post.

Thanks to dear friend Rahul Updadhyaya, he has pull me out  today to write this up 🙂

Apologize for not putting diagrams right now, will work on it sooner.

This post is about cinder create volume data/code flow.

Example: cinder create 1 –display-name firstvol –volume-type FCVolumeType

1. Start with calling the cinder api:

File: cinder/api/v1/volumes.py

Method: def create(self, req, body): #validates cinder api arguments.

2. Above method calls “cinder.volume.api.API”, taken from  “volume_api_class” a flag from cinder.conf.

self.volume_api.create() # here self.volume_api created from “cinder.volume.api.API”

File: cinder.volume.api.API

Method: def create(self….)

This function store necessary data into database with volume status as ‘creating’.

3. Above method further calls cinder schedule.

self.scheduler_rpcapi.create_volume() # Making asynchronous cast on cinder-scheduler

4. Next asynchronous cast makes it to the cinder/scheduler/manager.py def create_volume()

this in turn calls: self.driver.schedule_create_volume() #here, the self.driver points to scheduler_driver flag in cinder.conf

Now, this could be SimpleScheduler or FilterScheduler (in case of multi-backend)

5. Incase of SimpleScheduler, above  method calls

File: cinder/scheduler/simple.py

Method: def schedule_create_volume()

above method next calls: self.volume_rpcapi.create_volume() # which makes asynchronous cast on selected host

Here, you can view host info with #cinder-manger host list

6. Message is reached to volume/manager.py

File: cinder/volume/manager.py

Method: def create_volume() # calls _create_volume() and make call to volume driver’s create_volume()

self.driver.create_volume() # driver is chosen with volume_driver flag from cinder.conf, this return metadata about volume

And volume status is changed from ‘creating’ to ‘available’.
Tempest: An OpenStack Integration test suite

Integration Testing:

  • Integration Testing is the phase in software testing in which individual software modules are combined and tested as a group.
  • It occurs after unit testing and before system testing.
  • Tests the actual functionality of the application/software you have written.

Why wasting time in integration tests when I have an option to check the functionality manually?

  • Because every time you add a new feature you will have to check and re-check the functionalities manually which is tedious, time-consuming and error-prone.
  • What if you have thousands of features, certainly you can’t afford to check if them one by one.
  • If you claim that your software is platform-independent. How will you make sure that all the functionalities of your software are intact on multiple platforms? That’s where a ‘test-suite’ comes into picture. You can create a dedicated test environment to run your test-suite across different platforms adhering to your scale and stress needs.

I have written unit tests properly. Why should I write integration tests?

  • Because unit-tests test the source code you have written, the semantic and the syntax, not the actual functionality of your software.
  • Integration tests make sure that your source code, when integrated with all your components, serves the real purpose.
  • With addition of a new feature you can just re-trigger the suite and hence make sure that your new feature doesn’t break any existing functionality.

What is tempest?

  • One of Tempest’s prime function is to ensure that your OpenStack cloud works with the OpenStack API as documented. The current largest portion of Tempest code is devoted to test cases that do exactly this.
  • It’s also important to test not only the expected positive path on APIs, but also to provide them with invalid data to ensure they fail in expected and documented ways. Over the course of the OpenStack project Tempest has discovered many fundamental bugs by doing just this.
  • In order for some APIs to return meaningful results, there must be enough data in the system. This means these tests might start by spinning up a server, image, etc., then operating on it.
  • Currently tempest has support to test both APIs and CLIs.

How to run the tempest tests?

  • There are multiple ways to run the tests. You have a choice to run the entire test suite, all the tests in a directory, a test module or a single tests.
  • The documents describes how to run the tempest tests using nosetests.
  • Install the basic dependencies:
  • Go to the directory tempest and execute the tests with the following command;
    • nosetests -sv tempest.tests.identity.admin.test_services.py [ This would run all the tests inside the module test_services.py]
    • nosetests -sv tempest.tests.identity.admin.test_services:ServicesTestJSON.test_create_get_delete_service [This runs a specific tests inside the class ServiceTestJSON of the module test_services.py]

Basic Architecture

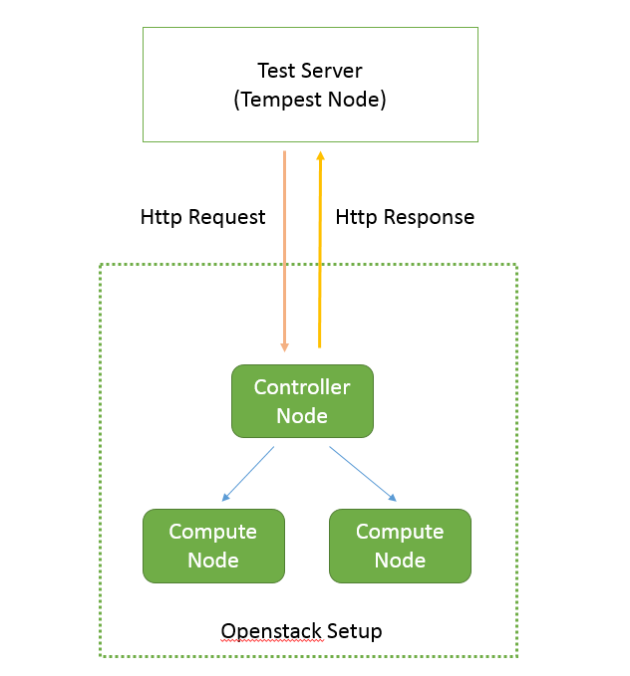
  • Tempest tests can be executed from either outside the openstack setup or from the openstack controller itself.
    • The tempest has a rest client implemented in the suite which takes care of the REST operations.
    • All the user inputs which are performing the rest operationon nova apis are read from tempest.conf file.
    • The suite first make a rest call to the keystone api to get the auth token and tenant details for authorization and authentication.
    • Using the auth token obtained from the response, the tests performs the required operations.

More to follow…

  • Debugging using eclipse..
  • Extending tempest framework for your project..

Debug Openstack code Local / Remote with Eclipse and PyDev Plug-In

This article is a result of my exhaustive search for finding a concrete way to debug Openstack. After referring several places, I have come up with a manual of my own on how to setup eclipse environment to debug and understand openstack code flow. It should be a good read if you have similar questions as posted below in your mind.

  • Is it possible to debug openstack code end-to-end?
  • Should I debug locally (everything configure inside eclipse)?
  • How to debug remotely running openstack services?Or, combination of above two?
  • What developer tools/IDEs to use for debugging? (eclipse +pydev, pdb, winpdb, pycharm)?
  • What’s the best/easiest/more sophisticated method, to get set everything quickly?

And there’s bunch of other questions, followed by multiple alternatives to chose from.

Here in this post, I have tried debugging using Eclipse with pydev plug-in.

Development Environment:

Linux Distro: centos/ ubuntu, (I used VM workstation)
Install eclipse as per os type 32/64 bit on one of the VM: http://www.eclipse.org/
Configure python Interpreter in eclipse.
Install git plugin (only for local debug): http://download.eclipse.org/egit/updates, add this in Help-> install new software

How to  Debug Openstack Services Locally?

To begin with, you can try with keystone in eclipse.

Also, setup environment variables under debug configuration for keystone service to pick up.
OS_USERNAME,
OS_PASSWORD,
OS_TENANT_NAME,
OS_REGION_NAME,
OS_AUTH_URL
Optionally, Setup keystone.conf file as argument under debug configuration dialog.
For example, to test setup, put a break-point at:
File: keystone/identity/core.py
Method: def get_all_tenants(self, context, **kw):
Now, execute keystone-all (debug as-> python run) from eclipse

As you have already install keystoneclient by following above link, from terminal execute:

$keystone tenant-list

(check db is running, iptables service not blocking port – just in case if get 500 error with tenant-list)
This should hit break-point in keystone service running in eclipse and ask to move to debug perspective.

Voila, You have just got setup for local debugging.

Remote Debugging: 

Development Environment: 

In this case, I have used two VMs, one is centos and other is ubuntu 12.04.
Ubuntu VM- running  eclipse IDE with pydev plug-in.
Centos VM –  openstack services running.
Configure python Interpreter in eclipse.

Configure pydev debug server in eclipse.

To Remote debug, following link has most of the answers:

http://pydev.org/manual_adv_remote_debugger.html

Now, copy /pysrc directory from ubuntu vm to centos vm.

/pysrc – will be found in eclipse installation plugins/org.python.pydev_<version>/pysrc

On centos (Remote machine), preferred place to copy under python site-package.

Ex: /usr/lib/python2.6/site-packages/pysrc/

Example-1: Remote debug keystone

Run the debug server in eclipse, note the debug server port.
File: keystone/keystone/identity/core.py

Function: def get_all_tenants(self, context, **kw):  # gives tenant-list

Under this function add line:

import pydevd;pydevd.settrace(<IP addr of eclipse vm>, port=8765, stdoutToServer=True, stderrToServer=True,suspend=True)

Next,File: /keystone/bin/keystone-all
To add pysrc to PYTHONPATH:  add following line after “import sys” line

sys.path.append(‘/usr/lib/python2.6/site-packages/pysrc/’)

eventlet.patcher.monkey_patch(all=False, socket=True, time=True, thread=monkeypatch_thread)
Comment out above this line, and add following line:

eventlet.patcher.monkey_patch(all=False, socket=True, time=True, thread=False)

This most important for debugging, otherwise you will received “ThreadSuspended” error in eclipse.

As, the debug server listen to single thread, above line will take away green threading of thread module.

Restart keystone service
$service keystone restart

$keystone tenant-list

On eclipse, switch to debug perspective.

You should be able to hit break-point in core.py file, and step through further debug execution.

Eclipse_debug_server2

Example-2: Debugging keystone(get auth-token) + nova-api

$nova flavor-list                #will debug this cli

File: /keystone/keystone/service.py
Class: class TokenController
Method:def authenticate(self, context, auth=None):

Add following line:
import pydevd;pydevd.settrace(‘<IP addr of eclipse vm>’, port=8765, stdoutToServer=True, stderrToServer=True,suspend=True)

Next,File: /keystone/bin/keystone-all
To add pysrc to PYTHONPATH:  add following line after “import sys” line
sys.path.append(‘/usr/lib/python2.6/site-packages/pysrc/’)
eventlet.patcher.monkey_patch(all=False, socket=True, time=True, thread=monkeypatch_thread)
Comment this line, and add following line:

eventlet.patcher.monkey_patch(all=False, socket=True, time=True, thread=False)

This most important for debugging, otherwise you will received “ThreadSuspended” error in eclipse.

As, the debug server listen to single thread, above line will take away green threading of thread module.

Restart keystone service

Next, File: nova/nova/api/openstack/compute/flavors.py
Class: class Controller(wsgi.Controller):
Method:
@wsgi.serializers(xml=FlavorsTemplate)

def detail(self, req):

Add following line under this function:

import pydevd;pydevd.settrace((<IP addr of eclipse vm>, port=8765, stdoutToServer=True, stderrToServer=True,suspend=True)

File: nova/bin/nova-api
Add line after “import sys”

sys.path.append(‘/usr/lib/python2.6/site-packages/pysrc/’)

eventlet.monkey_patch(os=False)
comment above line, and change to:

eventlet.monkey_patch(all=False,socket=True,time=True,os=False,thread=False)

$service keystone restart
$service nova-api restart
$ nova flavor-list

In eclipse, this should hit break-point in service.py for keystone

Eclipse_debug_server3

After keystone token generated, control move to flavors.py

Eclipse_debug_server4

Things observed:

Path resolution:

If python paths and/or openstack code paths different on both VMs, eclipse will not be able to locate correct file to open, and respond with open file dialog, just cancel the dialog and file from remote machine get displayed. This file will get store into prsrc/temporary_file directory.
To avoid this, on server running openstack service, go to pysrc directory, and modify the file, pydevd_file_utils.py.

More info on this: http://pydev.org/manual_adv_remote_debugger.html

The whole idea for this blog post is to try out alternatives to debug openstack code.
I have taken simplest possible examples in very short time, to demonstrate, it works!!

Basics of Python

This is a basic python tutorial (basic enough to let you start with OpenStack)

Topics covered

  1. Introduction
  2. Basic Syntax
  3. Data types and variables
  4. Loops and conditionals
  5. Functions and Methods
  6. Classes and objects
  7. Python Specifics

Introduction

  1. Python is an easy to learn, powerful programming language
  2. Dynamic type
  3. Interpreted
  4. Can be extended using C or C++
  5. Comes with a large standard library that covers areas such as string processing (regular expressions, Unicode, calculating differences between files), Internet protocols (HTTP, FTP, SMTP, XML-RPC, POP, IMAP, CGI programming), software engineering (unit testing, logging, profiling, parsing Python code), and operating system interfaces (system calls, filesystems, TCP/IP sockets).
  6. Standard modules and packages from : http://pypi.python.org/pypi
  7. Download and install from here: http://www.python.org/download/releases/2.7.3/
  8. FAQ on python: http://docs.python.org/2/faq/general.html
  9. Python Success Stories: http://www.python.org/about/success/

Basic Syntax

  1. Files should have the extension “.py”. They are called modules
    e.g.
    my_first_program.py
  2. The file can have any name, any number of classes and methods.
  3. There are no braces {} or semicolons ; in python. It is a very high level language. Instead of braces, blocks are identified by having the same indentation.
  4. The program execution starts from main.
  5. if the python interpreter is running that module (the source file) as the main program, it sets the special __name__ variable to have a value ”__main__”. If this file is being imported from another module, __name__ will be set to the module’s name.
  6. Comments start with ‘#’ symbol, and there no block comments in python
  7. e.g.


    if __name__=="__main__":
    print "Hello World"
    print "This is out of the if block"
    #This is a comment
    #This is also a comment
    print "Hello World"

    view raw

    BlockDesc1.py

    hosted with ❤ by GitHub

Data types and variables

  1. Variables do not need to be declared and their data-types are inferred from the assignment statement.
  2. e.g.


    A = 'string var'
    A = 24
    A = 24.0

    view raw

    SimpleVars.py

    hosted with ❤ by GitHub

  3. Python supports the following data types:
    • Boolean:
      • True
      • False
    • Integer
    • long
    • float
    • String
    • List:
      • A list is a mutable sequence of mixed data type.
      • mix = [1, 2, "solaris", (1, 2, 3)]
    • Tuple:
      • A tuple is an immutable sequence of mixed data type.
      • mix = (1, 2, "solaris", (1, 2, 3))
      • return (3 + 7)# This is an expression
      • return (3 + 7, ) # This is a tuple
    • Set:
      • A set is an unordered collection of data with no duplicate elements.
      • A set supports operations like union, intersection or difference.
      • set1 = set([‘a’, ‘b’, ‘c’, ‘c’, ‘d’])
      • set2 = set([‘a’, ‘b’, ‘x’, ‘y’, ‘z’])
      • set supports operations like union, intersection or difference. Similar as in Mathematics.
    • Dictionary:
      • A Python dictionary is a group of key-value pairs. The elements in a dictionary are indexed by keys. Keys in a dictionary are required to be unique.
      • Diction = {1: 'cat', 2:'apple'}
    • Object
    • None

Loops and conditionals

  1. if:
    if expr: statement
  2. if-else:

    if expr: statement1
    else: statement2
    if-elseif: if expr: statement1
    elif expr: statement2
    else: statement3
  3. Multiple elifs can be included in the same if statement. There is no switch or case statement so multiple elifs must be used instead. While parenthesis are not required around the expression, they can be used.

  4. if a > b: print "a is greater than b";
    if (a > b):
    print "a is greater than b"
    print "blocks are defined by indentation"
    elif (a < b):
    print "a is less than b"
    else:
    print "a is equal to b"

    view raw

    SimpleCon.py

    hosted with ❤ by GitHub

  5. Loops
    • For:
      for var in range(start [,stop [,inc]]): statements
      var can be any variable. The range statement can take start and stop values, and an increment.
    • while:

      while expr: statements

      Executes statements while the expression is true.
    • continue: continue
      Skips the rest of the body of the loop for the current iteration and continue execution at the beginning of the next iteration.
    • break: break
      Ends the execution of the current loop.
    • else: else
      for and while loops can both have else clauses, which are executed after the loop terminates normally by falsifying the conditional, but else clauses are not executed when a loop terminates via a break statement.
    • foreach: for x in array: statements
      Loops over the array given by array. On each iteration, the value of the current element is assigned to x and the internal array pointer is advanced by one.

    • value = ["abhi", "cena", "dhoni", "bruce wayne"]
      for j in range(4): print "Value number " + str(j) +" is "+value[j]
      x=0
      for j in range(10,0,-2):
      x = x + j
      print x
      b=1
      a=5
      while (b<a):
      print "b is less than a."
      b=b+1
      else:
      print "b is equal to a now"
      k=0
      for j in range(0,10):
      while(k < j):
      print "j = " + str(j) + " k = "+str(k)
      if (j == 1): break
      k=k+1
      print "j equals k or j equals 1"
      a = ["abc","def","ghi"]
      for x in a:
      print x

Functions

    1. Definition: Functions in Python are defined with the following syntax:

      def myfunct(arg_1, arg_2, ..., arg_n):
      return value
    2. Any Python code, including other function and class definitions, may appear inside a function. Functions may also be defined within a conditional, but in that case the function’s definition must be processed prior to its being called.
    3. Python does not support function overloading but does support variable number of arguments, default arguments, and keyword arguments.
    4. Return types are not specified by functions.
    5. Arguments: Function arguments are passed by value so that if you change the value of the argument within the function, it does not get changed outside of the function. If you want the function to be able to modify non-local variables, you must declare them as global in the first line of the function. Note that if you declare any variables as global, that name cannot be reused in the argument list, i.e. this would cause an error:

    6. def double(x):
      global x
      x = x*2
      return
      double(x)
      #Instead this could be done
      def double(n):
      n = n * 2
      return n
      x = double(x)
      # Or
      function doubleX():
      global x
      x = x * 2
      return
      doubleX()

    7. Default Arguments: A function may define default values for arguments. The default must be a constant expression or array and any defaults should be on the right side of any non-default arguments.

      def person_name(n = 'Abhi'):
      return n + " Rocks!!"

      If this function is called with person_name(), it will return Abhi Rocks!!, Otherwise, if it is called with person_name(“John”), it will return John Rocks!!
    8. Variable length argument lists: Variable length arguments are supported by being wrapped up in a tuple. Before the variable number of arguments, zero or more normal arguments may occur:The special syntax, *args and **kwargs in function definitions is used to pass a variable number of arguments to a function. The single asterisk form (*args) is used to pass a non-keyworded, variable-length argument list, and the double asterisk form is used to pass a keyworded, variable-length argument list.
    9. e.g.


      def var_args(farg1, farg2, *args, **kargs):
      print "formal arg:", farg1
      print "formal arg:", farg2
      print 'Length of', len(args)
      for arg in args:
      print 'vararg:' , arg
      for key in kargs:
      print key
      sample_keyarg = {1:’abhi’, 2:’smart’}
      var_args(1,2, sample_keyarg, “abhi”, “kk”, “jj”, (“r”, “p”), ram = 85, shyam=45 )
      #Output:
      #formal arg: 1
      #formal arg: 2
      #Length of args 5
      #vararg: {1: 'abhi', 2: 'smart'}
      #vararg: abhi
      #vararg: kk
      #vararg: jj
      #vararg: ('r', 'p')
      #ram
      #shyam

      view raw

      MethodArgs.py

      hosted with ❤ by GitHub

    10. Return: Values are returned from the function with the return command: return var. You can’t return multiple values, but that can be achieved by returning an array or object.

Return immediately ends execution of the function and passes control back to the line from which it was called.

  1. Variable Functions: Python supports the concept of variable functions. That means that if a variable can point to a function instead of a value. Objects within a method can be called similarly.

  2. def test():
    print 'This is a test.'
    var = test
    var() #this calls test()
    var = circle.setRadius
    var(3) #this calls circle.setRadius(3)

    view raw

    VarFun.py

    hosted with ❤ by GitHub

Classes and Objects

  1. The simplest form of class definition looks like this:
    class ClassName:
    <statement-1>
    .
    .
    .
    <statement-N>
  2. The class instantiation calls the __init__ method of the class which can be over written:

  3. class MyClass:
    """A simple example class"""
    def __init__(self):
    self.i = 12345
    def f(self):
    return 'hello world'

    view raw

    SimpleClass.py

    hosted with ❤ by GitHub

  4. The argument self tells that method is a class method

  5. # Function defined outside the class
    def f1(self, x, y):
    return min(x, x+y)
    class C:
    f = f1
    def g(self):
    return ‘hello world’
    h = gprint type(C)
    print type(C())
    my_new_obj = C()
    print my_new_obj.f(23,45)
    print my_new_obj.g()
    #Output:
    #<type 'classobj'>
    #<type 'instance'>
    #23
    #hello world

    view raw

    InlineMethod.py

    hosted with ❤ by GitHub

  6. Inheritance:class DerivedClassName(BaseClassName):
    <statement-1>
    .
    .
    .
    <statement-N>

Python Specifics

  1. Packages
    • Packages are a way of structuring Python’s module namespace by using “dotted module names”.
    • Every package has __init__.py module which is empty bydefault.
    • The __init__.py files are required to make Python treat the directories as containing packages; this is done to prevent directories with a common name, such as string, from unintentionally hiding valid modules that occur later on the module search path. In the simplest case, __init__.py can just be an empty file, but it can also execute initialization code for the package or set the __all__ variable.
  2. Importing * From a Package: Will import only those modules which have been listed in __all__ variable in the __init__.py module of the package.
    e.g. __all__ = ['mod1', 'mod2']
  3. Decorators:
    • Decorators allow you to inject or modify code in functions or classes.
    • The actual method is compiled with the decoration and is substituted
    • A simple e.g. to illustrate decorator

    • def entryExit(f):
      def new_f():
      print "Entering", f.__name__
      f()
      print "Exited", f.__name__
      new_f.__name__ = f.__name__
      return new_f
      @entryExit
      def func1():
      print “inside func1()
      @entryExit
      def func2():
      print “inside func2()”func1()
      func2()
      print (“*”)*40
      #without decorator
      def func1_wd():
      print “inside func1()”
      def func2_wd():
      print “inside func2()”
      fwd1 = func1_wd
      fwd2 = func2_wd
      entryExit(fwd1)()
      entryExit(fwd2)()