GRE Tunnels in OpenStack Neutron

Assaf Muller

In the last post we gave context – How are GRE tunnels used outside of the virtualization world.

In this post we’ll examine how GRE tunnels are an alternative to VLANs as an OpenStack Neutron cloud networking configuration. GRE tunnels like VLANs have two main roles:

  1. To provide connectivity between all VMs in a tenant network, regardless of which compute node the VMs reside in
  2. To segregate VMs in different tenant networks

Example Topology

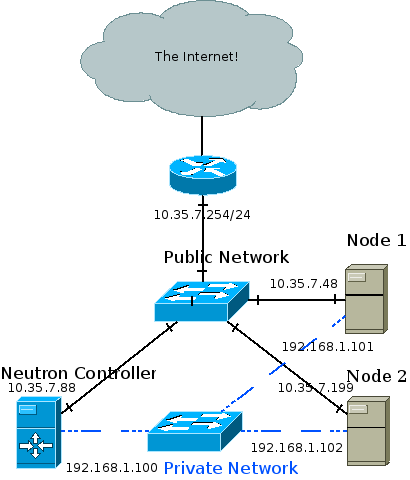
Topology Neutron GRE

The recommended deployment topology is more complicated and can involve an API, management, data and external network. In my test setup the Neutron controller is also a compute node, and all three nodes are connected to a private network through which the GRE tunnels are created and VM traffic is forwarded. Management traffic also goes through the private network. The public network is eventually connected to the internet and is also how I SSH into the…

View original post 1,994 more words

OpenStack-Cinder: create volume data/code flow

Hello Folks,

I guess, its been quite some time since my last post. Actually, didn’t get time some free time cover up this post.

Thanks to dear friend Rahul Updadhyaya, he has pull me out  today to write this up 🙂

Apologize for not putting diagrams right now, will work on it sooner.

This post is about cinder create volume data/code flow.

Example: cinder create 1 –display-name firstvol –volume-type FCVolumeType

1. Start with calling the cinder api:

File: cinder/api/v1/volumes.py

Method: def create(self, req, body): #validates cinder api arguments.

2. Above method calls “cinder.volume.api.API”, taken from  “volume_api_class” a flag from cinder.conf.

self.volume_api.create() # here self.volume_api created from “cinder.volume.api.API”

File: cinder.volume.api.API

Method: def create(self….)

This function store necessary data into database with volume status as ‘creating’.

3. Above method further calls cinder schedule.

self.scheduler_rpcapi.create_volume() # Making asynchronous cast on cinder-scheduler

4. Next asynchronous cast makes it to the cinder/scheduler/manager.py def create_volume()

this in turn calls: self.driver.schedule_create_volume() #here, the self.driver points to scheduler_driver flag in cinder.conf

Now, this could be SimpleScheduler or FilterScheduler (in case of multi-backend)

5. Incase of SimpleScheduler, above  method calls

File: cinder/scheduler/simple.py

Method: def schedule_create_volume()

above method next calls: self.volume_rpcapi.create_volume() # which makes asynchronous cast on selected host

Here, you can view host info with #cinder-manger host list

6. Message is reached to volume/manager.py

File: cinder/volume/manager.py

Method: def create_volume() # calls _create_volume() and make call to volume driver’s create_volume()

self.driver.create_volume() # driver is chosen with volume_driver flag from cinder.conf, this return metadata about volume

And volume status is changed from ‘creating’ to ‘available’.

Cruising the Cloud ecosystem as newbie and avoid getting hit by Lightening.

This Article is taken from my Friend/Mentor Atul Jha‘s Blog post. It is a some of the points which are always good to know.

OpenStack is a maintained by Open-Source Enthusiasts. This is little different setup that normal Office setup elsewhere. Everyone from the community is ready to help you in all possible ways, However, You need to understand that no one is paid/obliged to do so. You need to make sure you do your homework and are absolutely sure what you are asking and if asking that makes perfect sense ?

You can regularly see people posting irrelevant questions on various forums/IRC. In this article we shall deal what homework you need to do before approaching the community. Do not be a “Cloud Hippie” . Cloud Hippie can be defined as a person who  in 30 minutes they want to have there Infrastructure as cloud service running (IaaS).This may be a student whose professor forced him to do it in such short timeline or an IT Professional whose boss who wants him to look for FOSS alternatives to available proprietary products.


Best Practices : Getting Involved.

1. Building blocks of cloud

As far as i know these are the 3 main building block of IaaS. You need to do some homework on doing some basic reading on these three topics before proceeding.

1.1 OS

Please spend sometime, in case you have never used any Linux Distribution and once your familiar with it move to next. In case you think what  am I talking about,  many people want to deploy IaaS without basic Linux Admin skill set. Needless to say, fail rates touch nearly 100% :( . If you want a quick start, you can look at this section on iLearnStack.

1.2 Virtualization

Try to read up on what Virtualization is? What is it all about. Trying to work without understanding virtualization is like trying to run before you can stand up. You need to understand what a hypervisor means. Basic building concepts behind it, and understanding how it is different from a Cloud environment . You can have a head-start here on iLearnstack

1.3 Networking

In a virtualized/cloud environment, if you have the whole infrastructure up but he network in problematic state, you lose everything. This goes on the say the importance on networking in  a cloud-based environment. You need to understand the basics of Linux Networking and Security. You need to understand the concepts of bridging, virtual switches, routing, DHCP and DNS and basic network configuration. On iLearnStack you can start here and look for articles that speak on Networking.

2. Knowing your IaaS

Market is full of alternatives Cloudstack/Eucalyptus/Openstack and others.
You have to understand what exactly you want to achieve, set your priorities in place. You need to clearly understand the differences and the advantages each one has over the others.

2.1 Programming language its written.

It becomes easy to understand how things work if you go through the code. Openstack especially is best understood with the greatest amount of documentation and explanations being embedded in the code. You should understand Python which is fairly simple to pick up given you already know some programming language. However, if you are new, you can start reading our Python-Section on iLearnStack to start with, which deals in a comparative way about learning python.

2.2 Basic idea about each components.

Every IaaS has its own components. If your using Eucalyptus you will find
terms like NC/CC/Walrus & if using Openstack you will find nova/glance/swift/keystone.  Go through the blog, basic install guide try to know some basics about the service you finally want to deploy. You can find the details of the project inside Openstack described in a relevant way on this page.

3. What do you want finally?

So now once you have done your homework.

3.1 Hypervisor (Kvm/Xen)

You will be easily in position to decide what hypervisior you are going to use according to your internal needs.

3.2 Operating system (Ubuntu/Fedora/Redhat)

After reading through basic documentation you can easily decide which distribution it is more easy to deploy and maintain. Remember you also need to get regular security updates, bug fixes as well. :)

4. Getting Help

This is the crossroad. You tried everything still in pain/bleeding. It might be bug, your typo in config file or anything.

4.1 Forum

Most projects has a place where people discuss when they are stuck or even when they have something to share. Trust me in most cases many others would have stuck where you are currently. You can put you genuine questions on ask.openstack.org

4.2 Visit IRC

This is where the devs sit, don`t ask ASL there.  Trust me not everyone is paid to answer your questions unlike very few. So be polite and ask questions without demanding or cribbing :) . You can join the IRC on freenode at #openstack.

4.3 Go to the mailing list

 Join the mailing list of the project to know more whats happening inside. To receive daily/digest you can follow the instructions on this-wiki-page to set up your subscription.

5. Contribute

5.1 Report bugs, whats wrong/missing.

Every project needs people to find issues. Launchpad or other hosted platform has inbuilt bug reporting tool. :)

5.2 Write a blog explaining your install doc.

Please note any single achievement you have done is incredible, spreading it will help other newbie.

5.3 Help others at IRC/Mailing list.

This is your time to join the flock, help those who are stuck :)

5.4 Evangelism

Spread the word in your area, you might be only one with this expertise. It will be really cool to help and get more inside community. :)
In case i am still not able to make things clear follow big daddy`s guide ” How to ask question in smart way”

What is Sudo ?

Background Information

In Linux (and Unix in general), there is a SuperUser named Root. The Windows equivalent of Root is Administrators group. The SuperUser can do anything and everything, and thus doing daily work as the SuperUser can be dangerous. You could type a command incorrectly and destroy the system. Ideally, you run as a user that has only the privileges needed for the task at hand. In some cases, this is necessarily Root, but most of the time it is a regular user.

By default, the Root account password is locked in Ubuntu. This means that you cannot login as Root directly or use the su command to become the Root user. However, since the Root account physically exists it is still possible to run programs with root-level privileges. This is where sudo comes in – it allows authorized users (normally “Administrative” users; for further information please refer to AddUsersHowto) to run certain programs as Root without having to know the root password.

This means that in the terminal you should use sudo for commands that require root privileges; simply prepend sudo to all the commands you would normally run as Root. For more extensive usage examples, please see below. Similarly, when you run GUI programs that require root privileges (e.g. the network configuration applet), use graphical sudo and you will also be prompted for a password (more below). Just remember, when sudo asks for a password, it needs YOUR USER password, and not the Root account password.

Please keep in mind, a substantial number of Ubuntu users are new to Linux. There is a learning curve associated with any OS and many new users try to take shortcuts by enabling the root account, logging in as root, and changing ownership of system files.

Example: Broken system via (ab)use of root by a new user

Please note: At the time of the post, this was the users first post on the Ubuntu forums. While some may say this is a “learning experience”, learning by breaking your system is frustrating and can result in data loss.

When giving advice on the Ubuntu Forums and IRC, please take the time to teach “the basics” such as ownership, permissions, and how to use sudo / gksu / kdesudo in such a way that new users do not break systems.

Advantages and Disadvantages
sudo

Benefits of using sudo

Some benefits of leaving Root logins disabled by default include the following:

The Ubuntu installer has fewer questions to ask.

Users don’t have to remember an extra password (i.e. the root password), which they are likely to forget (or write down so anyone can crack into their account easily).

It avoids the “I can do anything” interactive login by default (e.g. the tendency by users to login as an “Administrator” user in Microsoft Windows systems), you will be prompted for a password before major changes can happen, which should make you think about the consequences of what you are doing.

sudo adds a log entry of the command(s) run (in /var/log/auth.log). If you mess up, you can always go back and see what commands were run. It is also nice for auditing.

Every cracker trying to brute-force their way into your box will know it has an account named Root and will try that first. What they don’t know is what the usernames of your other users are. Since the Root account password is locked, this attack becomes essentially meaningless, since there is no password to crack or guess in the first place.

Allows easy transfer for admin rights, in a short term or long term period, by adding and removing users from groups, while not compromising the Root account.

sudo can be setup with a much more fine-grained security policy.

The Root account password does not need to be shared with everybody who needs to perform some type of administrative task(s) on the system (see the previous bullet).

The authentication automatically expires after a short time (which can be set to as little as desired or 0); so if you walk away from the terminal after running commands as Root using sudo, you will not be leaving a Root terminal open indefinitely.

Downsides of using sudo

Although for desktops the benefits of using sudo are great, there are possible issues which need to be noted:

Redirecting the output of commands run with sudo requires a different approach. For instance consider sudo ls > /root/somefile will not work since it is the shell that tries to write to that file. You can use ls | sudo tee -a /root/somefile to append, or ls | sudo tee /root/somefile to overwrite contents. You could also pass the whole command to a shell process run under sudo to have the file written to with root permissions, such as sudo sh -c “ls > /root/somefile”.

In a lot of office environments the ONLY local user on a system is Root. All other users are imported using NSS techniques such as nss-ldap. To setup a workstation, or fix it, in the case of a network failure where nss-ldap is broken, Root is required. This tends to leave the system unusable unless cracked. An extra local user, or an enabled Root password is needed here. The local user account should have its $HOME on a local disk, _not_ on NFS (or any other networked filesystem), and a .profile/.bashrc that doesn’t reference any files on NFS mounts. This is usually the case for Root, but if adding a non-Root rescue account, you will have to take these precautions manually.

Alternatively, a sysadmin type account can be implemented as a local user on all systems, and granted proper sudo privileges. As explained in the benefits section above, commands can be easily tracked and audited.

Usage

When using sudo, your password is stored by default for 15 minutes. After that time, you will need to enter your password again.

Your password will not be shown on the screen as you type it, not even as a row of stars (******). It is being entered with each keystroke!

sudo

To use sudo on the command line, preface the command with sudo, as below: Example #1

sudo chown bob:bob /home/bob/*

Example #2

sudo /etc/init.d/networking restart

To repeat the last command entered, except with sudo prepended to it, run:

sudo !!

Graphical sudo

You should never use normal sudo to start graphical applications as Root. You should use gksudo (kdesudo on Kubuntu) to run such programs. gksudo sets HOME=~root, and copies .Xauthority to a tmp directory. This prevents files in your home directory becoming owned by Root. (AFAICT, this is all that’s special about the environment of the started process with gksudo vs. sudo).

Examples:

gksudo gedit /etc/fstab

or

kdesudo kate /etc/X11/xorg.conf

To run the graphical configuration utilities, simply launch the application via the Administration menu.

gksudo and kdesudo simply link to the commands gksu and kdesu

Drag & Drop sudo

This is a trick from this thread on the Ubuntu Forums.

Create a launcher with the following command:

gksudo “gnome-open %u”

When you drag and drop any file on this launcher (it’s useful to put it on the desktop or on a panel), it will be opened as Root with its own associated application. This is helpful especially when you’re editing config files owned by Root, since they will be opened as read only by default with gedit, etc.

Users

Allowing other users to run sudo

To add a new user to sudo, open the Users and Groups tool from System->Administration menu. Then click on the user and then on properties. Choose the User Privileges tab. In the tab, find Administer the system and check that.

In Hardy Heron and newer, you must first Unlock, then you can select a user from the list and hit Properties. Choose the User Privileges tab and check Administer the system.

In the terminal (for Precise Pangolin, 12.04), this would be:

sudo adduser <username> sudo

where you replace <username> with the name of the user (without the <>).

In previous version of Ubuntu

sudo adduser <username> admin

would have been appropriate, but the admin group has been deprecated and no longer exists in Ubuntu 12.04.

Logging in as another user

Please don’t use this to become Root, see further down in the page for more information about that.

sudo -i -u <username>

For example to become the user amanda for tape management purposes.

sudo -i -u amanda

The password being asked for is your own, not amanda’s.

root account

Enabling the root account

Enabling the Root account is rarely necessary. Almost everything you need to do as administrator of an Ubuntu system can be done via sudo or gksudo. If you really need a persistent Root login, the best alternative is to simulate a Root login shell using the following command…
sudo -i

To enable the Root account (i.e. set a password) use:

sudo passwd root

Use at your own risk!

Logging in to X as root may cause very serious trouble. If you believe you need a root account to perform a certain action, please consult the official support channels first, to make sure there is not a better alternative.

Re-disabling your root account

If for some reason you have enabled your root account and wish to disable it again, use the following command in terminal…

sudo passwd -dl root

Other Information

Misconceptions

Isn’t sudo less secure than su?

The basic security model is the same, and therefore these two systems share their primary weaknesses. Any user who uses su or sudo must be considered to be a privileged user. If that user’s account is compromised by an attacker, the attacker can also gain root privileges the next time the user does so. The user account is the weak link in this chain, and so must be protected with the same care as Root.

On a more esoteric level, sudo provides some features which encourage different work habits, which can positively impact the security of the system. sudo is commonly used to execute only a single command, while su is generally used to open a shell and execute multiple commands. The sudo approach reduces the likelihood of a root shell being left open indefinitely, and encourages the user to minimize their use of root privileges.

I won’t be able to enter single-user mode!

The sulogin program in Ubuntu is patched to handle the default case of a locked root password.

I can get a root shell from the console without entering a password!

You have to enter your password.

Console users have access to the boot loader, and can gain administrative privileges in various ways during the boot process. For example, by specifying an alternate init(8) program. Linux systems are not typically configured to be secure at the console, and additional steps (for example, setting a root password, a boot loader password and a BIOS password) are necessary in order to make them so. Note that console users usually have physical access to the machine and so can manipulate it in other ways as well.

Special notes on sudo and shells

None of the methods below are suggested or supported by the designers of Ubuntu.

Please do not suggest this to others unless you personally are available 24/7 to support the user if they have issues as a result of running a shell as Root.

To start a root shell (i.e. a command window where you can run Root commands), starting Root’s environment and login scripts, use:

sudo -i (similar to sudo su – , gives you roots environment configuration)

To start a root shell, but keep the current shell’s environment, use:

sudo -s (similar to sudo su)

For a brief overview of some of the differences between su, su -, and sudo -{i,s} see : Ubuntu Forums Post with nice table .

Summary of the differences found –

corrupted by user’s

HOME=/root uses root’s PATH env vars

sudo -i Y Y[2] N

sudo -s N Y[2] Y

sudo bash N Y[2] Y

sudo su N N[1] Y

[1] PATH=/usr/local/sbin:/usr/local/bin:/usr/sbin:/usr/bin:/sbin:/bin:/usr/games

probably set by /etc/environment

[2] PATH=/usr/local/sbin:/usr/local/bin:/usr/sbin:/usr/bin:/sbin:/bin:/usr/X11R6/bin

For a detailed description of the differences see man su and man sudo .

Remove Password Prompt For sudo

If you disable the sudo password for your account, you will seriously compromise the security of your computer. Anyone sitting at your unattended, logged in account will have complete Root access, and remote exploits become much easier for malicious crackers.

This method is NOT suggested nor supported by the designers of Ubuntu.

Please do not suggest this to others unless you personally are available 24/7 to support the user if they have issues as a result of running a shell as Root.

These instructions are to remove the prompt for a password when using the sudo command. The sudo command will still need to be used for Root access though.

Edit the sudoers file

Open a Terminal window. Type in sudo visudo. Add the following line to the END of the file (if not at the end it can be nullified by later entries):

<username> ALL=NOPASSWD: ALL

Replace <username> with your user name (without the <>). This is assuming that Ubuntu has created a group with the same name as your user name, which is typical. You can alternately use the group users or any other such group you are in. Just make sure you are in that group. This can be checked by going to System->Administration->Users and Groups

Example:

michael ALL=NOPASSWD: ALL

Type in ^x to exit. This should prompt for an option to save the file, type in Y to save.

Log out, log back in. This should now allow you to run the sudo command without being prompted for a password.

Reset sudo timeout

You can make sure sudo asks for password next time by running:

sudo -k
File Permissions in Linux

Understanding and Using File Permissions

In Linux and Unix, everything is a file. Directories are files, files are files and devices are files. Devices are usually referred to as a node; however, they are still files. All of the files on a system have permissions that allow or prevent others from viewing, modifying or executing. If the file is of type Directory then it restricts different actions than files and device nodes. The super user “root” has the ability to access any file on the system. Each file has access restrictions with permissions, user restrictions with owner/group association. Permissions are referred to as bits.

To change or edit files that are owned by root, sudo must be used – please seeRootSudo for details.

If the owner read & execute bit are on, then the permissions are:

-r-x------

There are three types of access restrictions:

Permission Action chmod option
read (view) r or 4
write (edit) w or 2
execute (execute) x or 1

There are also three types of user restrictions:

User ls output
owner -rwx------
group ----rwx---
other -------rwx

Note: The restriction type scope is not inheritable: the file owner will be unaffected by restrictions set for his group or everybody else.


Folder/Directory Permissions

Directories have directory permissions. The directory permissions restrict different actions than with files or device nodes.

Permission Action chmod option
read (view contents, i.e. ls command) r or 4
write (create or remove files from dir) w or 2
execute (cd into directory) x or 1
  • read restricts or allows viewing the directories contents, i.e. ls command
  • write restricts or allows creating new files or deleting files in the directory. (Caution: write access for a directory allows deleting of files in the directory even if the user does not have write permissions for the file!)
  • execute restricts or allows changing into the directory, i.e. cd command

Folders (directories) must have ‘execute’ permissions set (x or 1), or folders (directories) will NOT FUNCTION as folders (directories) and WILL DISAPPEAR from view in the file browser (Nautilus).


Permissions in Action


user@host:/home/user$ ls -l /etc/hosts
-rw-r--r--  1 root root 288 2005-11-13 19:24 /etc/hosts
user@host:/home/user$

Using the example above we have the file “/etc/hosts” which is owned by the user root and belongs to the root group.

What are the permissions from the above /etc/hosts ls output?


-rw-r--r--

owner = Read & Write (rw-)
group = Read (r--)
other = Read (r--)


Changing Permissions

The command to use when modifying permissions is chmod. There are two ways to modify permissions, with numbers or with letters. Using letters is easier to understand for most people. When modifying permissions be careful not to create security problems. Some files are configured to have very restrictive permissions to prevent unauthorized access. For example, the /etc/shadow file (file that stores all local user passwords) does not have permissions for regular users to read or otherwise access.


user@host:/home/user# ls -l /etc/shadow
-rw-r-----  1 root shadow 869 2005-11-08 13:16 /etc/shadow
user@host:/home/user#

Permissions:
owner = Read & Write (rw-)
group = Read (r--)
other = None (---)

Ownership:
owner = root
group = shadow


chmod with Letters


Usage: chmod {options} filename
Options Definition
u owner
g group
o other
a all (same as ugo)
x execute
w write
r read
+ add permission
remove permission
= set permission

Here are a few examples of chmod usage with letters (try these out on your system).

First create some empty files:

user@host:/home/user$ touch file1 file2 file3 file4
user@host:/home/user$ ls -l
total 0
-rw-r--r--  1 user user 0 Nov 19 20:13 file1
-rw-r--r--  1 user user 0 Nov 19 20:13 file2
-rw-r--r--  1 user user 0 Nov 19 20:13 file3
-rw-r--r--  1 user user 0 Nov 19 20:13 file4

Add owner execute bit:

user@host:/home/user$ chmod u+x file1
user@host:/home/user$ ls -l file1
-rwxr--r--  1 user user 0 Nov 19 20:13 file1

Add other write & execute bit:

user@host:/home/user$ chmod o+wx file2
user@host:/home/user$ ls -l file2
-rw-r--rwx  1 user user 0 Nov 19 20:13 file2

Remove group read bit:

user@host:/home/user$ chmod g-r file3
user@host:/home/user$ ls -l file3
-rw----r--  1 user user 0 Nov 19 20:13 file3

Add read, write and execute to everyone:

user@host:/home/user$ chmod ugo+rwx file4
user@host:/home/user$ ls -l file4
-rwxrwxrwx  1 user user 0 Nov 19 20:13 file4
user@host:/home/user$


chmod with Numbers


Usage: chmod {options} filename
Options Definition
#-- owner
-#- group
--# other
1 execute
2 write
4 read

Owner, Group and Other is represented by three numbers. To get the value for the options determine the type of access needed for the file then add.

For example if you want a file that has -rw-rw-rwx permissions you will use the following:

Owner Group Other
read & write read & write read, write & execute
4+2=6 4+2=6 4+2+1=7


user@host:/home/user$ chmod 667 filename

Another example if you want a file that has –w-r-x–x permissions you will use the following:

Owner Group Other
write read & execute execute
2 4+1=5 1


user@host:/home/user$ chmod 251 filename

Here are a few examples of chmod usage with numbers (try these out on your system).

First create some empty files:

user@host:/home/user$ touch file1 file2 file3 file4
user@host:/home/user$ ls -l
total 0
-rw-r--r--  1 user user 0 Nov 19 20:13 file1
-rw-r--r--  1 user user 0 Nov 19 20:13 file2
-rw-r--r--  1 user user 0 Nov 19 20:13 file3
-rw-r--r--  1 user user 0 Nov 19 20:13 file4

Add owner execute bit:

user@host:/home/user$ chmod 744 file1
user@host:/home/user$ ls -l file1
-rwxr--r--  1 user user 0 Nov 19 20:13 file1

Add other write & execute bit:

user@host:/home/user$ chmod 647 file2
user@host:/home/user$ ls -l file2
-rw-r--rwx  1 user user 0 Nov 19 20:13 file2

Remove group read bit:

user@host:/home/user$ chmod 604 file3
user@host:/home/user$ ls -l file3
-rw----r--  1 user user 0 Nov 19 20:13 file3

Add read, write and execute to everyone:

user@host:/home/user$ chmod 777 file4
user@host:/home/user$ ls -l file4
-rwxrwxrwx  1 user user 0 Nov 19 20:13 file4
user@host:/home/user$


chmod with sudo

Changing permissions on files that you do not have ownership of: (Note that changing permissions the wrong way on the wrong files can quickly mess up your system a great deal! Please be careful when using sudo!)

user@host:/home/user$ ls -l /usr/local/bin/somefile
-rw-r--r--  1 root root 550 2005-11-13 19:45 /usr/local/bin/somefile
user@host:/home/user$

user@host:/home/user$ sudo chmod o+x /usr/local/bin/somefile

user@host:/home/user$ ls -l /usr/local/bin/somefile
-rw-r--r-x  1 root root 550 2005-11-13 19:45 /usr/local/bin/somefile
user@host:/home/user$


Recursive Permission Changes

To change the permissions of multiple files and directories with one command. Please note the warning in the chmod with sudo section and the Warning with Recursive chmod section.


Recursive chmod with -R and sudo

To change all the permissions of each file and folder under a specified directory at once, use sudo chmod with -R

user@host:/home/user$ sudo chmod 777 -R /path/to/someDirectory
user@host:/home/user$ ls -l
total 3
-rwxrwxrwx  1 user user 0 Nov 19 20:13 file1
drwxrwxrwx  2 user user 4096 Nov 19 20:13 folder
-rwxrwxrwx  1 user user 0 Nov 19 20:13 file2


Recursive chmod using find, pipemill, and sudo

To assign reasonably secure permissions to files and folders/directories, it’s common to give files a permission of 644, and directories a 755 permission, since chmod -R assigns to both. Use sudo, the find command, and a pipemill to chmod as in the following examples.

To change permission of only files under a specified directory.

user@host:/home/user$ sudo find /path/to/someDirectory -type f -print0 | xargs -0 sudo chmod 644
user@host:/home/user$ ls -l
total 3
-rw-r--r--  1 user user 0 Nov 19 20:13 file1
drwxrwxrwx  2 user user 4096 Nov 19 20:13 folder
-rw-r--r--  1 user user 0 Nov 19 20:13 file2

To change permission of only directories under a specified directory (including that directory):

user@host:/home/user$ sudo find /path/to/someDirectory -type d -print0 | xargs -0 sudo chmod 755 
user@host:/home/user$ ls -l
total 3
-rw-r--r--  1 user user 0 Nov 19 20:13 file1
drwxr--r--  2 user user 4096 Nov 19 20:13 folder
-rw-r--r--  1 user user 0 Nov 19 20:13 file2


Warning with Recursive chmod

WARNING: Although it’s been said, it’s worth mentioning in context of a gotcha typo. Please note, Recursively deleting or chown-ing files are extremely dangerous. You will not be the first, nor the last, person to add one too many spaces into the command. This example will hose your system:

user@host:/home/user$ sudo chmod -R / home/john/Desktop/tempfiles

Note the space between the first / and home.

You have been warned.


Changing the File Owner and Group

A file’s owner can be changed using the chown command. For example, to change the foobar file’s owner to tux:

user@host:/home/user$ sudo chown tux foobar

To change the foobar file’s group to penguins, you could use either chgrp or chown with special syntax:

user@host:/home/user$ sudo chgrp penguins foobar


user@host:/home/user$ sudo chown :penguins foobar

Finally, to change the foobar file’s owner to tux and the group to penguins with a single command, the syntax would be:

user@host:/home/user$ sudo chown tux:penguins foobar

Note that, by default, you must use sudo to change a file’s owner or group.

Directory Structure in Linux (Specifically:Ubuntu)

Ubuntu (like all UNIX-like systems) organizes files in a hierarchical tree, where relationships are thought of in teams of children and parent. Directories can contain other directories as well as regular files, which are the “leaves” of the tree. Any element of the tree can be references by a path name; an absolute path name starts with the character / (identifying the root directory, which contains all other directories and files), then every child directory that must be traversed to reach the element is listed, each separated by a / sign.

A relative path name is one that doesn’t start with /; in that case, the directory tree is traversed starting from a given point, which changes depending on context, called the current directory. In every directory, there are two special directories called . and .., which refer respectively to the directory itself, and to its parent directory.

The fact that all files and directories have a common root means that, even if several different storage devices are present on the system, they are all seen as directories somewhere in the tree, once they are mounted to the desired place.

FilePermissions are another important part of the files organization system: they are superimposed to the directory structure and assign permissionsto each element of the tree, ultimately decided by whom it can be accessed and how.

Examples

An absolute path name, pointing to what is normally an executable file on an Ubuntu system:

/usr/bin/test

An absolute path name, but pointing to a directory instead of a regular file:

/usr/bin/

A relative path name, which will point to /usr/bin/test only if the current directory is /usr/:

bin/test

A relative path name, which will point to /usr/bin/test if the current directory is any directory in /usr/, for instance /usr/share/:

../bin/test

A path name using the special shortcut ~, which refers to the current user’s home directory:

~/Desktop/

Path names can contain almost any character, but some characters, such as space, must be escaped in most software, usually by enclosing the name in quotation marks:

"~/Examples/Experience ubuntu.ogg"

or by employing the escape character \:

~/Examples/Experience\ ubuntu.ogg

Main directories

The standard Ubuntu directory structure mostly follows the Filesystem Hierarchy Standard, which can be referred to for more detailed information.

Here, only the most important directories in the system will be presented.

/bin is a place for most commonly used terminal commands, like lsmountrm, etc.

/boot contains files needed to start up the system, including the Linux kernel, a RAM disk image and bootloader configuration files.

/dev contains all device files, which are not regular files but instead refer to various hardware devices on the system, including hard drives.

/etc contains system-global configuration files, which affect the system’s behavior for all users.

/home home sweet home, this is the place for users’ home directories.

/lib contains very important dynamic libraries and kernel modules

/media is intended as a mount point for external devices, such as hard drives or removable media (floppies, CDs, DVDs).

/mnt is also a place for mount points, but dedicated specifically to “temporarily mounted” devices, such as network filesystems.

/opt can be used to store addition software for your system, which is not handled by the package manager.

/proc is a virtual filesystem that provides a mechanism for kernel to send information to processes.

/root is the superuser‘s home directory, not in /home/ to allow for booting the system even if /home/ is not available.

/sbin contains important administrative commands that should generally only be employed by the superuser.

/srv can contain data directories of services such as HTTP (/srv/www/) or FTP.

/sys is a virtual filesystem that can be accessed to set or obtain information about the kernel’s view of the system.

/tmp is a place for temporary files used by applications.

/usr contains the majority of user utilities and applications, and partly replicates the root directory structure, containing for instance, among others,/usr/bin/ and /usr/lib.

/var is dedicated variable data that potentially changes rapidly; a notable directory it contains is /var/log where system log files are kept.

Understanding Linux from a Windows User Perspective

What Is Linux?

Like Windows XP, Vista, and 7, and Mac OSX, GNU/Linux (often simply Linux) is a computer operating system (or OS). However, Linux differs from Windows OSes in a number of ways.

  • Linux is Free and Open Source Software. This means that all the source code of the Linux Kernel, as well as almost all the programs you will use with Linux, is freely available to anyone who wants to read and edit it. Linux is thus distinct from both Windows and OSX. N.B. In this context, Free Software is not always gratis, though it often (usually) is. To use the common metaphor, Linux is necessarily free as in speech, and usually free as in beer.
  • In common with OSX and the BSDs, Linux is derived from UNIX.
  • Linux is much more highly configurable than Windows. In Windows, the user can easily change many settings. On a Linux Distro, though, the user can change much more. The Desktop Environment or Window Manager used, for example, is much simpler to change in Linux, and has many more available options.

Linux is the Wikipedia of operating systems

The most distinguishing trait of Linux is its un-unified development process. No single entity makes or runs Linux. The Linux kernel, the core of the operating system, is developed and maintained by Linus Torvalds’ Linux Foundation, but distributions are created by many organizations and individuals all over the world, some paid for by donations and some completely voluntary. Each Linux Distro has it own development cycle, which is separate from the kernel development. In addition to this, the Desktop Environments and Window Managers are developed by yet other groups. This contrasts with the Microsoft way of doing things, where one company develops the whole OS: kernel, desktop environment, and much of the pre-installed software.

‘Linux’ technically isn’t just Linux

Linux is really just the kernel and the drivers packed with the kernel. The other 90% of the OSes typically called “Linux” are many little programs running together, made by many people in many organizations like GNU, Xorg, KDE,XFCE, etc. But instead of saying “I just installed Linux/Ubuntu/KDE/Xorg/GNU/Bob’s Email Program” we typically just call the whole thing Linux. Formally, though, Linux should only be used to refer to the Kernel. When referring to the whole operating system, GNU/Linux is preferable.

Distributions are the key for end-users

If you’re looking to try Linux, what you want to look for is a ‘distribution.’ Examples are Ubuntu, Fedora, Debian, and SuSE etc. Try googling “Linux Distributions” – there are a lot out there. Most Linux Distributions include instructions on how to make a ‘Live CD’, which allows you to boot your machine into Linux to try it without actually installing it.

A distribution takes care of the hundreds of hours of tweaking and brainwork to pull all of the separate programs which run on top of Linux together, and gets them playing nicely together before you (the end-user) try to use this blob of programs as a whole. The distribution you choose is fairly important: it’s almost like an OS in itself.

There aren’t really any EXEs in Linux

Linux doesn’t rely on filename extensions like DOS/Windows does. You can give a file almost any name and it will not affect the type of file it is. This is because the filesystems used by Linux use something called an “execute bit.” This is a switchable setting (kind of like read-only) on Linux/Unix files which says whether or not Linux should try to ‘run’ the file. When the user tries to run the file, Linux looks at the file header information for hints on how to run it, rather than depending on the file extension to determine what to do (as Windows does).

Most software is not installed by downloading and running a program

Most forms of Linux have an awesome thing called a Package Manager. The package manager accesses a huge online database of programs written for Linux and lists them. It’s kind of like Add/Remove Programs in Windows, except that most Linux applications can be installed right from the package manager, without visiting any websites, inserting any discs, or running any programs.

There are many advantages to using package managers over downloading software as an executable or binary (as you might on Windows from the website of the developer).

  • The packages are tested with your distro extensively. Since there are so many Linux distros, this could potentially otherwise become a problem.
  • Because the packages are ‘signed’ by testers, you can ensure that you are downloading what you think you are downloading.
  • You do not download unneccessary libraries, which you already have installed on your system. In WIndows, there is no way for the developer to tell what libraries your system already uses, so they must package all that are necessary, leading to larger downloads, longer install times, and software bloat.
  • You can easily uninstall completely, or even revert back to an older version number.
  • Software updates are much easier for the system to manage.

Linux loves scripting

If you can do it with a mouse in Linux, there is probably a command that will do the same thing. That means you can automate a lot of things right off the bat. A considerable number of developers recognize this culture, and write command-line programs first. Then, they write a GUI with all of the pictures and buttons we know and love. The GUI simply converts your clicks into commands which are run in the background.

The Terminology of Linux

The different terminology used in the Linux world can be confusing for a new user.

Some of the more common differences are:

  • Folders are referred to as ‘Directories’
  • The administrator account for a Linux system is called the root account.
  • The ‘command prompt’ in Windows is equivalent to the Terminal in Linux.

Devices and drive partitions are represented as files

USB ports, hard drives, any detected partitions on those hard drives, temperature sensors, and most any other device is represented by a file and placed in the ‘dev’ directory. Linux will give it some cryptic name once it is detected. The nice thing about this is that when you need to tell a program what port or hard drive to use, you simply point it to that file.

Filesystems are represented by directories

Directories have the ability to act like portals into other filesytems. You can tell almost any directory in Linux to lead into another filesystem on the same drive, another drive, a network drive, or even a ZIP file. This is called ‘mounting.’ For example, if you plugged a drive in with your movies you would then create a directory somewhere on your machine and tell Linux to mount the filesystem of that new drive to that directory. What that would do is cause that directory to represent that filesystem. When you go into that directory, you’re going into the drive. What’s crazier, you can create a directory in that filesystem and mount another filesystem on another drive on that first filesystem. This can make things tricky because one moment you’re on one filesystem on one drive, you enter a directory there, and suddenly you’re seamlessly on another filesystem on another drive… or in your printer’s FTP server, and you might not even realize it unless you actively check.

Everything revolves around the root directory

The root directory is the beginning of it all. This is basically your C: drive. To access other filesystems on other drives and their partitions, directories are created within this root directory which act as portals to those other filesystems. Remember, you can make almost any directory into a portal to another filesystem (it’s called mounting).


Sources : wikia

Contributing to Openstack/Open-Source as a non-developer, wondering how ?

Are you a motivated students/professional with a question : “I am not a developer tell me how can I contribute to OpenStack?” If yes, then I suggest you to go this carefully, should be helpful.

Open_Source

I was recently going thorough Atul Jha‘s post at Muktware [ Translated to Hindi : “Open”-ware ] and found this post really helpful if you ever had such a question in your mind, I have had so many students asking me this question that I thought I should definitely put it at iLearnStack.

One simple answer to their question was like any other FOSS project OpenStack too needs a lot of volunteers in many domains apart from developing the software. I would mention the areas in which one can contribute to OpenStack project.

Documentation

Documentation is a key component/part of any FOSS project. With so many components and codes getting added in every new release maintaining a quality doc is big ask. I would suggest this as a best place to start off with if one wants to join the OpenStack community. To understand how over all documentation process/workflow takes place this wiki.

Bug Report

It happens at times when you are trying out deployment & you noticed something which might be a bug. So you can simply report the bug along with explaining your environment setup and if possible attaching log file, screen shot. This will help the developers in reproducing and triaging the reported bugs. Also before filing the bug make sure to check if it has already been reported or not. One can file bugs related to the various OpenStack components.

Ask

We also have https://ask.openstack.org where people come and ask their questions, its one of the place where you can share your knowledge to the community. Also don’t forget to check the FAQ before you starting to answer the questions.

IRC

IRC stands for Internet Relay Chat, most FOSS projects has their own channels similarly OpenStack projects got some channels like : #openstack, #openstack-101, #openstack-dev, #openstack-doc on freenode server. In case you are not sure/aware how IRC works and which channel to be in this link will be helpful.

Evangelist

Success of free software depends on its adoption. Its always good to have lots and lots of people involved in spreading words about the software.

One can do it via many ways:

a) Social Media: Spreading information about the development , upcoming announcement, feature release on Twitter, facebook or your own personal blog. One can even create screen cast, podcasts & spread it among the peers. One can follow official OpenStack twitter handle.

b) Conferences & Meetups: Speaking about OpenStack at local meetup or opens source user groups or Conferences. One can even form a small team in his/her college/workplace & educate others about OpenStack, hosting a demo day would be a good idea as well. If you want to organize meetup in your town/city/county join this group. if a group already exists be part of it, help it.

Translations

OpenStack project has users from over 85 countries & English might not be the prime language of teaching. So if one wants he can be part of translation team & help us in putting OpenStack resources in his/hers local/prime language. The link will be helpful.

Once again, thanks Atul with helping us with this wonderful piece of information.

Tempest: An OpenStack Integration test suite

Integration Testing:

  • Integration Testing is the phase in software testing in which individual software modules are combined and tested as a group.
  • It occurs after unit testing and before system testing.
  • Tests the actual functionality of the application/software you have written.

Why wasting time in integration tests when I have an option to check the functionality manually?

  • Because every time you add a new feature you will have to check and re-check the functionalities manually which is tedious, time-consuming and error-prone.
  • What if you have thousands of features, certainly you can’t afford to check if them one by one.
  • If you claim that your software is platform-independent. How will you make sure that all the functionalities of your software are intact on multiple platforms? That’s where a ‘test-suite’ comes into picture. You can create a dedicated test environment to run your test-suite across different platforms adhering to your scale and stress needs.

I have written unit tests properly. Why should I write integration tests?

  • Because unit-tests test the source code you have written, the semantic and the syntax, not the actual functionality of your software.
  • Integration tests make sure that your source code, when integrated with all your components, serves the real purpose.
  • With addition of a new feature you can just re-trigger the suite and hence make sure that your new feature doesn’t break any existing functionality.

What is tempest?

  • One of Tempest’s prime function is to ensure that your OpenStack cloud works with the OpenStack API as documented. The current largest portion of Tempest code is devoted to test cases that do exactly this.
  • It’s also important to test not only the expected positive path on APIs, but also to provide them with invalid data to ensure they fail in expected and documented ways. Over the course of the OpenStack project Tempest has discovered many fundamental bugs by doing just this.
  • In order for some APIs to return meaningful results, there must be enough data in the system. This means these tests might start by spinning up a server, image, etc., then operating on it.
  • Currently tempest has support to test both APIs and CLIs.

How to run the tempest tests?

  • There are multiple ways to run the tests. You have a choice to run the entire test suite, all the tests in a directory, a test module or a single tests.
  • The documents describes how to run the tempest tests using nosetests.
  • Install the basic dependencies:
  • Go to the directory tempest and execute the tests with the following command;
    • nosetests -sv tempest.tests.identity.admin.test_services.py [ This would run all the tests inside the module test_services.py]
    • nosetests -sv tempest.tests.identity.admin.test_services:ServicesTestJSON.test_create_get_delete_service [This runs a specific tests inside the class ServiceTestJSON of the module test_services.py]

Basic Architecture

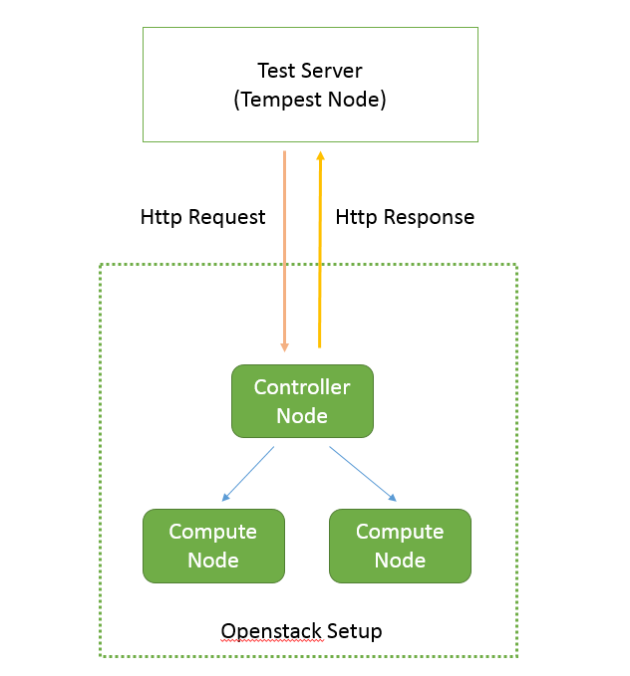
  • Tempest tests can be executed from either outside the openstack setup or from the openstack controller itself.
    • The tempest has a rest client implemented in the suite which takes care of the REST operations.
    • All the user inputs which are performing the rest operationon nova apis are read from tempest.conf file.
    • The suite first make a rest call to the keystone api to get the auth token and tenant details for authorization and authentication.
    • Using the auth token obtained from the response, the tests performs the required operations.

More to follow…

  • Debugging using eclipse..
  • Extending tempest framework for your project..

Event at M S Ramaiah Institute of Technology, Bangalore

Event Report

Date : 27 April,2013, Time : 11am-6pm.

Location : M.S. Ramaih Institute Of Technology, Bangalore, India. [Location]

Meetup Page : http://www.meetup.com/Indian-OpenStack-User-Group/events/116042452/

 This event was conducted by the Linux User Group at Ramaiah Institute of Technology, and was attended by 25 students + teachers who were keen to learn about virtualization/cloud/Openstack. This workshop was  open to interested students from all years.

The intent of the workshop was to introduce the college students, the budding future technologists to make them aware of Virtualization/Cloud and Openstack , topics which are generally missing from curriculum of majority of the undergraduate engineering colleges in India.

The workshop started with a general non-techical introduction to the  Openstack, conveying to the students of the opportunities and how do they get benefited by getting associated to Openstack and why the Openstack has been successful and has achieved such a long following in such a short period. We introduced them Openstack India User Group and made them aware of meetups and encouraged them to be a part of the same.

DSC_0002

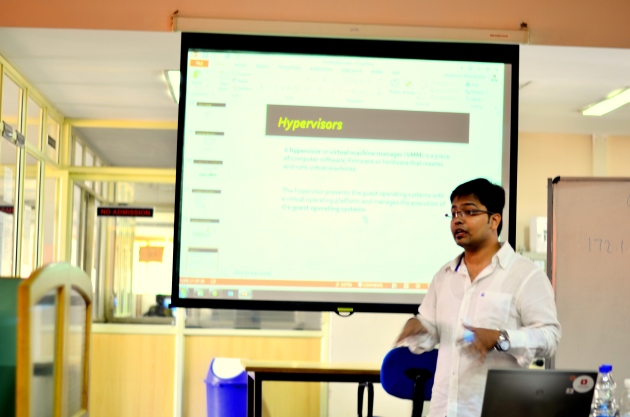
Then moving to the technical talks, Aligning to the intent of the workshop, Rahul began with a introduction to Virtualization and slowly moved on to the basics of Cloud .  The idea was to bring the attendees to a level where they could understand concepts used in Openstack.

DSC_0023

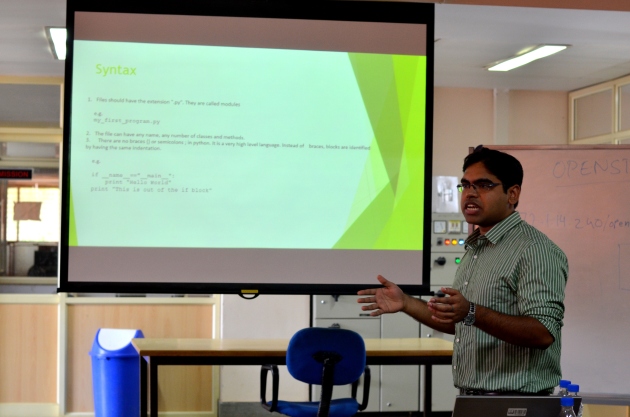
Further, a session on Python with a few examples was taken by Abhishek . Since most the attendees were new to Python, this session was very helpful to them . And because of obvious reasons this session had immense amount of attention being given by attendees and also the maximum number of queries being asked.

After a Lunch Break, Rahul gave a session on Openstack, covering its history, introducing each project under Openstack. Each project  and its purpose was explained in the most basic manner relating them to parts of their real machines.The session ended with encouraging the attendees to be a part of Openstack by starting to contribute.

DSC_0053

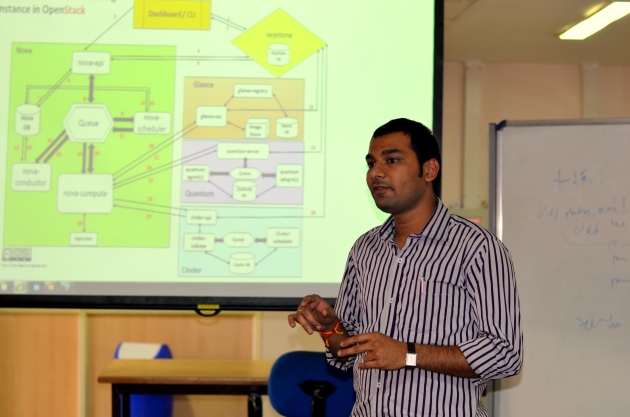
This session was followed by Romil who explained a high-level component interaction of Openstack components taking a use-case of a Virtual Machine being spawned. This further improved the understanding of working of various projects under Openstack for everyone.

DSC_0049DSC_0042

The last thing as planned for the day was a little hands-on. This was done by each attendee using Virtual Box on his laptop. During this process the ilearnstack team and specially Mayank helped anyone new with setting up Virtualbox, installing Ubuntu and setting up the networking. Once this was ready, all the attendees used the CloudGear Script prepared by Ishant to setup their own instances of Openstack and try it out on their Laptops.

DSC_0074

This brought us towards the end of the day and the end of the workshop. It gave us immense pleasure to interact such an enthusiastic bunch of students who were took out time to learn something out of their curriculum and were so interested and inquisitive all-throughout.

Complete Photoset for the event.: https://plus.google.com/photos/106314994124977332570/albums/5871977068052111873